Making a Raspberry Pi image builder
Because nothing beats automation
 Rust
Filesystems
Foreign Function Interface
Raspberry Pi
11 min read
Rust
Filesystems
Foreign Function Interface
Raspberry Pi
11 min read
Projects:
 Spark-Club
Repository:
rpi-imgpatcher
Spark-Club
Repository:
rpi-imgpatcher
My work with Spark-Club has led me to implement an IoT fleet. While the process to build a common system on each device came with its own set of complications, the most complicated was to write a guide to ensure anyone with a Mac could set up IoTs. After encountering one too many PEBKAC1 issues, I decided that having a single-step process was the new priority.
The old way: rpi-imager
I cannot overstate how much of rpi-imager is a work of art, passion, and dedication. When I set up the first Pi for Spark-Club, it just felt so easy, my Wi-Fi info was already there, I could SSH into the Pi without relying on Ethernet, I could take out the microSD card and restart the process to try new things,…
And, it’s great, really. I’m pretty sure anyone who gets their hand on a Pi would be delighted about how it just works, the GUI wizard is easy, image download, light customization,… It’s perfect, too perfect actually, because it’s only perfect for humans.
While the app can be started in CLI mode to control it from a script it’s unfortunately very limited, and the best you can do is attach a firstrun.sh file to the Linux image that will include some basic setup that will run on the device’s first boot.
Our requirements
When I finalized the setup required to run our Pis, we had the following files:
firstrun.shsets up the hostname, current user, wi-fi passwords,.authorized_keys, sound devices, services, and copies files to the user$HOMEdirectory.setup.shis ran on the user’s first boot, and sets up user-level configuration we don’t have access to during the first run process.{UUID}.spark-clubis the ENV file the device uses to uniquely identify itself.- And some more secret ingredients…
Since rpi-imager would only copy the first one to the image, there would be a multi-step process:
- Get the configuration files for the device being set up
- Flash the microSD with the Raspbian image, customized with
firstrun.sh. - Re-insert the microSD in the mac, and copy the rest of files on the device.
With too any steps, it was VERY EASY to for things to break, so I quickly looked into alternatives.
The alternatives: How much HEREDOC do you want?
The first thing I looked into was the --cloudinit-userdata <cloudinit-userdata> flag.
Touting itself as “The standard for customising cloud instances”, cloud-init could have solved my problem. As a Rails user, I’m not intimidated by YAML files, but writing huge files using YAML, while possible felt very counter-intuitive to my usage: I wanted to add multiple files at need, and here I was, writing their content and packing them all as strings in a dictionary.
The solution could have been there, but not for my needs.
The alternatives: “are you a sysadmin enough dude?”
Therefore, how else do you customize a Raspbian image?
Easily: you build your own.
I won’t even go there: there’s a point where “customizing your image” turns into “Spark-Club becomes the first sports company with its own Linux distribution”, and it’s a line I’m not crossing. But if you’ve got the team for it, if your business relies on owning the tech, and requires the distro tailored to your needs, it’s the perfect answer!
In-between: an image with arbitrary files
A Raspberry Pi image is actually a MBR2 defining two partitions: a 512MB FAT32 boot partition, and a 5-and-some-gigs ext4 Linux partition. While there are ways to play with an ext4 partition without mounting it, since my previous process involved mounting the microSD’s FAT32 boot partition to copy setup files, I thought playing with the boot partition would be the best (and easiest!) solution.
And it was!
Enter rpi-imgpatcher
Using mbrman to parse the MBR records and identify the FAT32 partition location on the drive, then a rust implementation of fatfs to manipulate the FAT32 partition filesystem, a quick Rust script managed to write a “Hello World” inside my image, which felt really great!
The next step was devising an API and turning it into a proper library, which led to some design decisions.
For instance, fatfs writes straight to the FAT buffer it’s working on, which means a careless approach would modify an image in place. If you want to generate multiple images, keeping the original untouched is a must3.
First design decision: we never modify the original image in place, the FAT partition is always extracted so it can be worked on, and then saved to a new file, keeping the original MBR record and ext4 partition intact (they are copied straight from the original image).
Second design decision: how to interact with the FAT filesystem. The simplest idea was an obvious add_file(fat_path: String, local_file: PathBuf), but I quickly realized I also needed to write arbitrary bytes, and even append to existing files, would be good, since it’s (almost!) what rpi-imager does when editing cmdline.txt.
After a few hours of work, I had a small but useful API I was very proud of:
1
2
3
4
5
6
7
8
impl RpiImage {
  pub fn new(image_path: impl AsRef<Path>) -> Result<Self, Error>
  pub fn read_file(&self, fat_path: &str) -> Result<Vec<u8>, Error>
  pub fn write_file(&mut self, fat_path: &str, file: impl AsRef<Path>) -> Result<u64, Error>
  pub fn write_bytes(&mut self, fat_path: &str, bytes: &[u8]) -> Result<u64, Error>
  pub fn append_bytes(&mut self, fat_path: &str, bytes: &[u8]) -> Result<u64, Error>
  pub fn save_to_file(self, out_file: impl AsRef<Path>) -> Result<(), Error>
}
Simple enough to use in a script, but flexible enough to cover most use cases I could think of.
I felt so good, that I decided against going to sleep (I mean, it was Sunday already morning, there was no point anymore), and kept adding features.
FFI: Foreign Function Interface
A huge selling point of rpi-imager, that can’t be overstated , is that it runs on all OSes, with a level of abstraction that’s close to artistry. Whatever your desktop OS is, it WORKS.
In my case, this wasn’t a concern: the whole team uses MacBooks. I did consider using a Rust GUI library for a while, but I felt like going the extra mile and learning some more. Plus I had already written an FFI implementation (for a WASM library) a few days ago, so things felt fresh, and it’s always fun to use nm in CLI to look at a library’s contents.
Just as much as I love C for the beauty of its design, I love the Foreign function interface. Just imagine: by using a common calling method, you can compile your Rust code into a library, and then that library can be called by a script language,…
It does, however, come with caveats: everyone must adhere to C is the common denominator, which can sometimes be a hurdle. While ::new() was easy to write (we just return a pointer to an opaque struct, could be worse!), ::write_file came with some complications: how to return a value OR an error? Rust’s Result<Ok, Err> makes this trivial, but in C…?
I’m not gonna blow your brains here, the answer is as old as C: one goes in the return value, the other in an outparam, a function argument that can be modified and checked by the caller. By convention, the return value is the Ok() value and the outparam is the Err() value, if there is one.
A simple macro made quick work of it:
1
2
3
4
5
6
7
8
macro_rules! return_out {
  ($out:expr, $err:expr) => {
    if !$out.is_null() {
      unsafe { *$out = $err };
    }
    return -1;
  };
}
A “writing” function would return the number of bytes written, or -1 in the case of an error, and the error value would be the out param. Perfect!
Which got me to my first real defeat: ::read().
While C is beautiful, it’s also a harsh mistress, and won’t let you casually move string buffers around. The cleanest way to get a String from rust to C is to know its size, allocate a buffer, and give it to Rust to write into.
Unfortunately, the fatfs library doesn’t implement an easy ::size() function on a file, which means my C API has no way to know the file size before reading it. The only alternative would be to have Rust allocate a buffer, lose ownership of it, and give it to C, which is the best way to leak memory (and nobody wants that).
A similar issue came when implementing the C API for ::read_bytes(). While the argument is just an array of bytes, C has no native idea of arrays4. Therefore, from C, you must pass both a pointer to the array of bytes AND its length. Nothing too hard, but always a surprise.
In the end, with a good C API, I could write a full implementation test in C, and the library was ready to integrate into anything, even a Swift app, which was the initial goal!
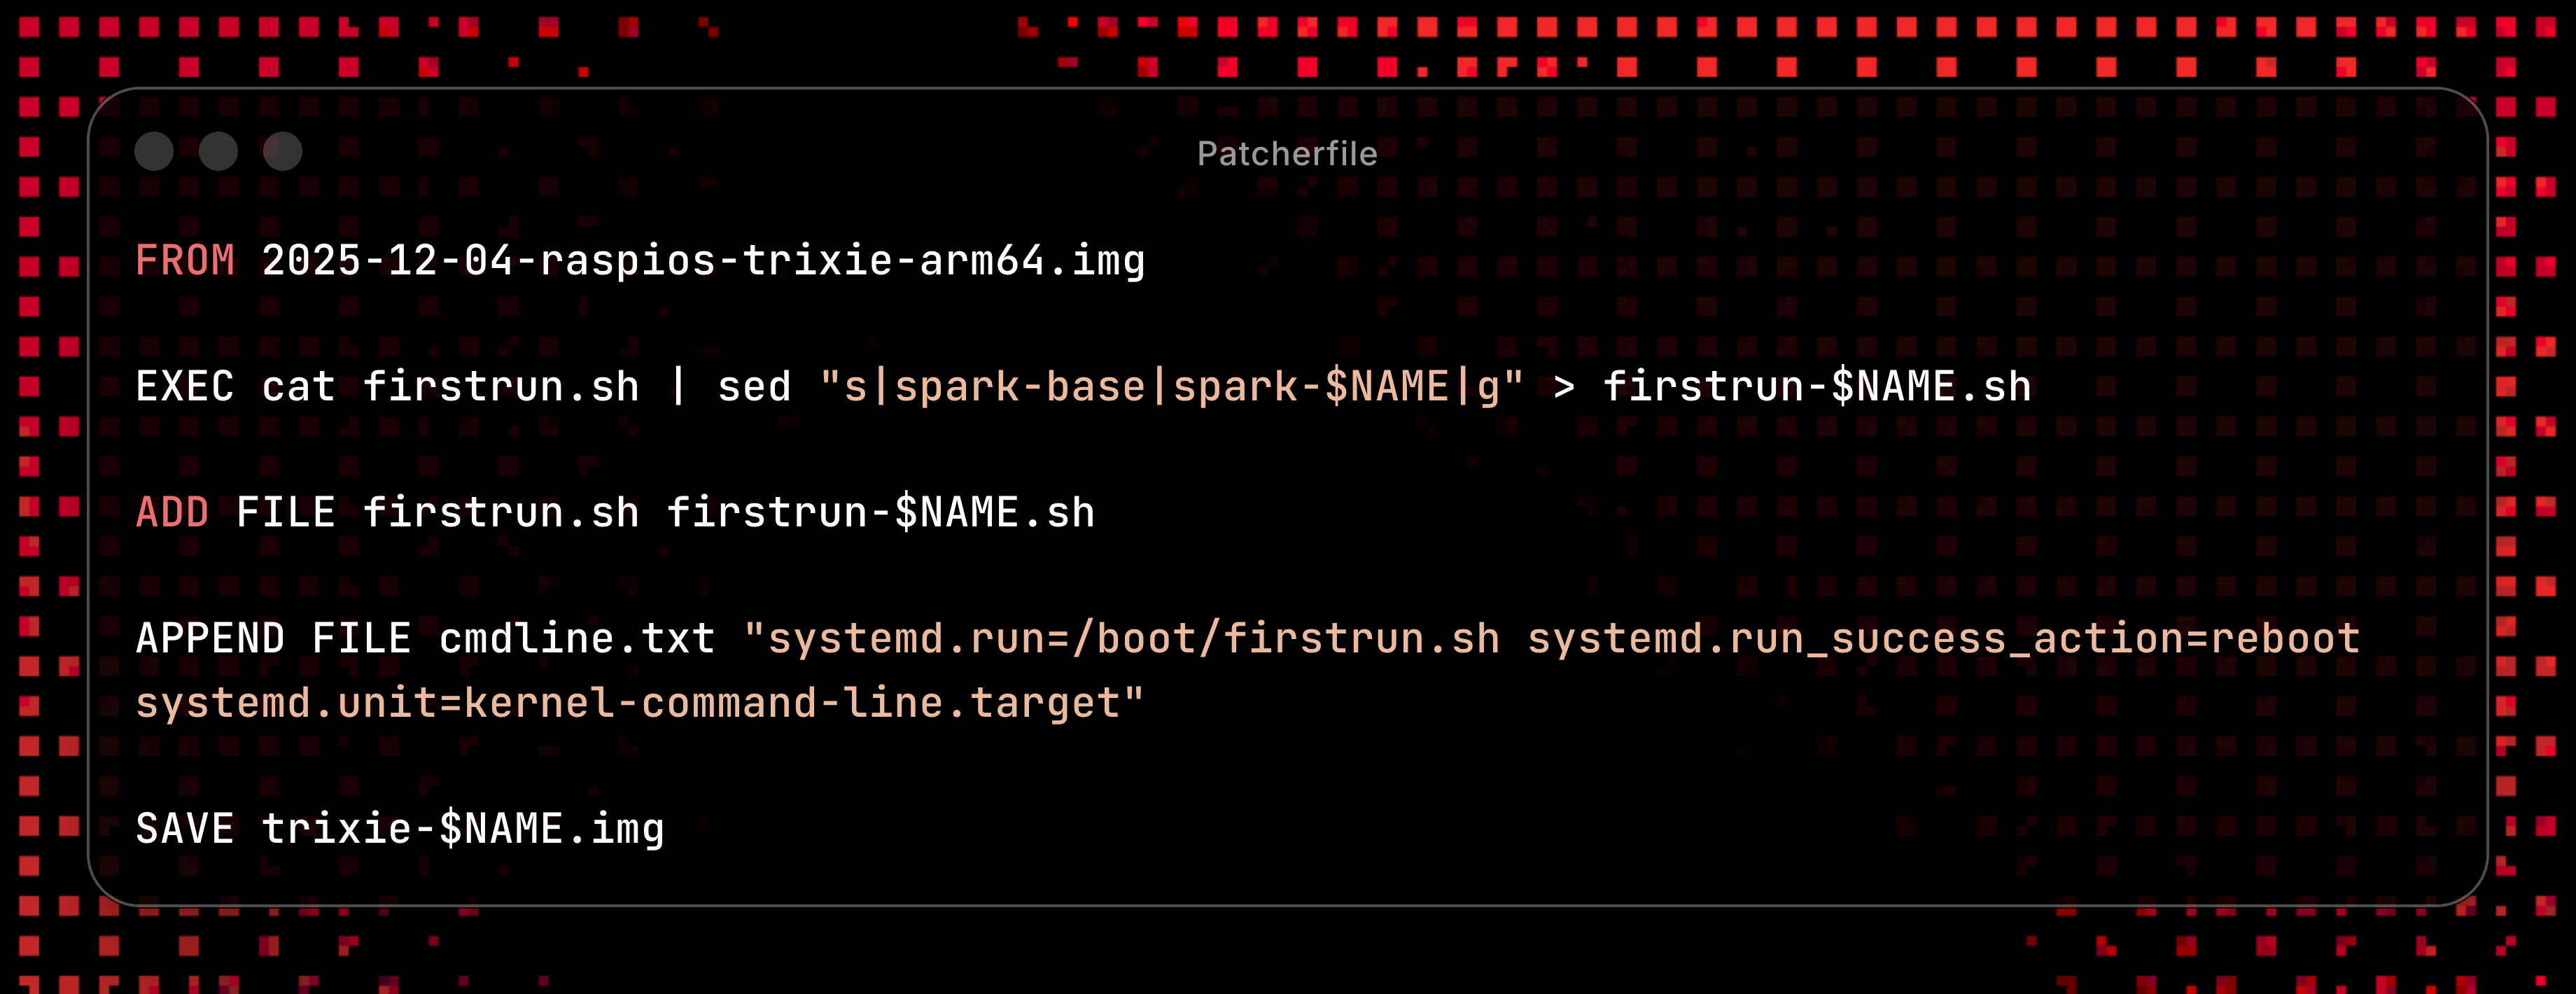
Everyone wants their Thingfile
I wasn’t ready to sleep yet. While I was coding, one idea kept coming back: “Why not have a DSL for the tool?”. I mean, sure, you could use the library from any language, but really…would you want to?
That’s why I needed a binary, and not something with a bloated args parsing library. Since docker got the Dockerfile, having a similar DSL felt like a no-brainer:
1
2
3
4
5
6
7
8
9
10
FROM 2025-12-04-raspios-trixie-arm64.img

EXEC cat firstrun.sh | sed "s|spark-base|spark-$NAME|g" > firstrun-$NAME.sh

ADD FILE firstrun.sh firstrun-$NAME.sh
(...more instructions)

APPEND FILE cmdline.txt "systemd.run=/boot/firstrun.sh systemd.run_success_action=reboot systemd.unit=kernel-command-line.target"

SAVE trixie-$NAME.img
I love writing parsers for DSLs, especially in Rust. Every time I write a small VM for an AdventOfCode exercise, Rust’s match operator makes it a delight to do, and the implementation of traits trivialized turning error enums into helpful error messages.
So it comes as no surprise that my problem wasn’t with the code, but with the image itself: Raspbian follows instructions from cmdline.txt to boot up. When you set up a firstrun.sh in rpi-imager, it appends a configuration telling it to run it on first boot.
As the name implies, it’s a single line.
Which comes back to bite you the moment you realize the original file ends with a newline, preventing any meaningful APPEND operation on it.
Maybe because of the lack of sleep, I decided to add an APPEND CMDLINE instruction to the DSL, and treat this file as a special case. Though saner people may prefer overwriting the whole file with a clean one with ADD FILE.
And because there’s no such thing as “enough work”, I also added $VARIABLE substitution using environment variables, turning what started as a script into a proper build pipeline.
One last thing
Anytime you download a Raspbian image from the Raspberry Pi image server, it comes as a .xz file, a compression format derived from LZMA. There is a Rust library that can handle that, of course, but the question was: how much changes would I have to implement if I wanted to support reading from (or even writing to!) a .xz archive?
The answer was…not much.
My original implementation was based on File structs, and passing data from input to output using std::io::copy. Do you notice the arguments to that function? Those are generic traits: std::io::Read and std::io::Write.
As long as I could provide a type implementing those traits, everything became plug-and-play5, and could even be extended to any archive type exposing a Read stream.
That said, my enthusiasm had limits: reading from a .img.xz slowed things down by a factor of 10: from ~6 seconds to nearly a minute. And my patience ran out before even trying to save an .img.xz archive.
Nonetheless, discovering how Rust traits can improve internal API compatibility was yet another moment of appreciation for the language’s design, just like when I first discovered how Ruby’s Enumerable works.
Coming next
Despite a few rough edges, the API already feels very close to production-ready. The real test now is integrating it into my Swift desktop application.
-
Problem Exists Between Keyboard And Chair ↩︎
-
A Master Boot Record is the boot sector of a hard drive, defining its partitions. ↩︎
-
It feels shameful to admit, but I don’t have fiber at home, and my download speed is limited to 2MB/s. ↩︎
-
While C strings are “char arrays”, and by convention end on
\0, and while it’s often a convention to indicate the end of a pointer array with aNULL, it’s not a convention you can rely on for arbitrary data! ↩︎ -
I’m not gonna sugar-coat it, type-checker’s ability to guide you through any change you make is a huge reason to love Rust. ↩︎